
If you know me, you’ve probably heard me shouting from the rooftops today about my amazing win: a YEAR of free paint from my favorite paint brand, Rust-oleum!
To celebrate this momentous occasion (because ’round these parts, we celebrate EVERYTHING!), I’m giving you this step by step instructional on how I made an awesome chalkboard WALL in my home. (Ignore the mess; we live here).
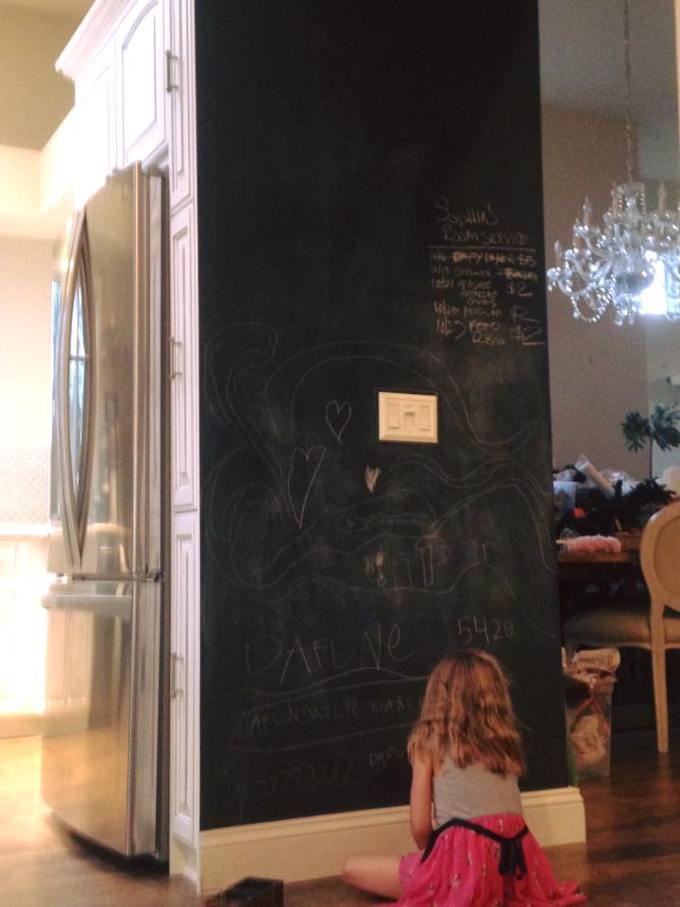
Instead of building you up to this, I’m going to start with the main image. This is a wall in my home. When we renovated our kitchen, the new fridge was a tad (like 8″) too deep for the existing fridge cutout, so I designed this panel with pullout spice racks to extend the space. What it left us with was a weird, extremely smooth white wall. It wasn’t drywalled, and it couldn’t really be painted with regular paint. Design in mind, I thought hard on how to deal with this challenge, and came up with what I think was a pretty rad solution: a floor to ceiling chalkboard wall.

Isn’t is the coolest??? I hope you think so!!
I had put this picture up on my personal Facebook wall, and my friends had tons of questions and comments. I realized, this should be a blog post! I’ll tell you how I did it, what kind of chalk we’re using to avoid a mess, and how it’s holding up.
So here’s the shameless plug – Rust-0leum, Rust-oleum, Rust-oleum. Nothing else is going to work like this, I promise. I paint a LOT of chalkboards. It’s kind of in the job description of event planner/artist. Rust-oleum Chalk Board Paint is the BEST.
I started by lightly sanding the surface of the wall, to help the paint adhere. I wanted the wall to not just look like a chalkboard, but to work like one too, meaning be MAGNETIC. Enter, Rust-oleum Magnetic Primer.

Here’s a cool fact about this – you do NOT have to use it with the Chalk Board Paint. You can use this under ANY color of interior paint, and it makes the surface magnetic. You don’t have to do it on walls, either. If you want to make a shoebox magnetic, paint a few coats of this stuff on, and bam. Magnetic shoebox. There are no rules.
Back to my wall; I would love to tell you that I used a fancy painting system, but I didn’t. I don’t take good care of supplies because I’m always in a hurry and I don’t always clean up right away, so I used a cheap foam roller without nap. (Nap is the fuzzy stuff on paint rollers, this one is smooth). Like the cheapest possible foam roller I could find. I did three coats of magnetic primer, and I still had over half the can. I will magnetize more things in the future, that’s for sure.
After letting those coats dry overnight, I started in with the Chalk Board Paint. The can looks like this:

This packaging design even makes me happy. I love this stuff. Using the same cheap foam roller from the day before (yes, I had rinsed it out), I applied two coats of Rust-oleum Chalk Board paint to the wall, covering it fully. Because I do things in a hurry, and I don’t like waiting, my finish came out a little blotchy looking. No worries. Once it dried, using a fine grit sandpaper, I sanded down the wall from top to bottom using a circular motion. Presto, perfectly even, smooth chalkboard wall finish.
This next part is important. You don’t just start writing on this wall. You have to SEASON the chalkboard you’ve created. This is fun! Take a piece of chalk, and using the side, rub it ALL OVER the chalkboard. You are covering the board in white. Then, using a dry microfiber rag, wipe the whole thing down, again, using circular motions.
Now you’re ready to write your heart out.
One question that came up the most among my friends was, “How do you control the chalk dust?” Trust me, it was a concern. We just renovated, I am doing all I can to REMOVE dust from the house, the last thing I need is something that MAKES dust.
So friends, I’m here to tell you that DUSTLESS CHALK is a thing. I picked this pack up at Target for like a buck:

Here’s a closeup of the baseboard and the floor after our youngest had been madly writing her chalkboard memoirs for an hour:


Virtually NO mess. I like no mess kid activities. They make my day. When we want to erase this now, I just use a damp microfiber rage, and it’s good as new. We’ve also been experimenting with colored chalk!
Here are a couple photos of holiday walls I created on the new wall!


So, that’s the story of my chalk wall. I am so delighted and grateful for getting the be the winner of the Rust-oleum free paint for a year contest! (EEEEEE!!! A YEAR!!!!!) My very first shipment is going out this week, and you can bet I chose Chalk Board paint! Links on where to find all these cool items are posted at the very bottom of this post, but the Chalk Board paint and Magnetic Primer are sold in most major hardware stores, including Home Depot, Lowes, and Ace Hardware, as well as many craft and hobby shops. Accept no imitations!
So go on, go paint something! It’s easy! Feel free to post any questions in the comments, and send me pictures of YOUR chalk wall if you make one!
Until then, “Celebrate Everything!”
AFFILIATE LINKS TO FIND THE PRODUCTS — USED IN THIS PROJECT: